Data Transfer
Moving files between local computer and remote server can be done via terminal (console) using the scp, rsync, and sftp commands, see examples below. Another popular option how to transfer files is to use MobaXterm or WinSCP Windows clients. Examples to those to commands can be found below.
Transfer Data Between Local and Remote Computers
Using the Terminal (console)
These options are available without additional software instalation on Mac OS, Linux and Windows 11 (Powershell). The commands scp, rsync, and sftp must be started from local computer. For more information about these commands, type man scp, man rsync, or man sftp in the terminal (console), or visit the web pages for scp, rsync, or sftp.
scp commands: basic syntax
scp (secure copy protocol) is a network protocol to securely copy files and directories. scp allows you to transfer files/directories between local/remote host or between two remote hosts. If you want to copy files to the directory in which you are currently located, use the dot at the end of the command.
General syntax for scp command
scp [options] [user@local_host]:<source_path> [user@remote_host]:<destination_path>
Copying data files and directories from a local computer to a remote server.
scp -P 5522 <path-to-source-file-on-local-computer> <username>@login.<cluster>.sav.sk:<path-to-destination-file-on-cluster>
scp -r -P 5522 <path-to-source-folder-on-local-computer> <username>@login.<cluster>.sav.sk:<path-to-destination-folder-on-cluster>
Copying data files and directories from a remote server to a local computer.
scp -P 5522 <username>@login.<cluster>.sav.sk:<path-to-source-file-on-cluster> <path-to-destination-file-on-local-computer>
scp -r -P 5522 <username>@login.<cluster>.sav.sk:<path-to-destination-folder-on-cluster> <path-to-destination-folder-on-local-computer>
scp -r -P 5522 <username>@login.<cluster>.sav.sk:<path-to-source-folder-on-cluster> .
rsync Command: Basic Syntax
rsync can be used for mirroring data, copying files between systems, backups, and as a replacement for scp, sftp, and cp. Its advantage is that it reduces the amount of data sent by transferring only the differences between the source files and the files already present at the destination. If you want to transfer more than a few small files, it is recommended to use the rsync command, since connections can fail on either side or other unspecified issues can occur. Rsync can be used together with the SSH protocol via "-e".
General syntax of rsync is:
rsync [options] [user@local_host]:<source_path> [user@remote_host]:<destination_path>
Copying a file from a local computer to a remote server.
To show the progress while transferring data from the local computer to the remote server, use the --progress option or -P.
rsync -avhe "ssh -p 5522" <path-to-source-file-on-local-computer> <username>@login.<cluster>.sav.sk:<path-to-destination-file-on-cluster>
rsync -avhe "ssh -p 5522" --progress <path-to-source-file-on-local-computer> <username>@login.<cluster>.sav.sk:<path-to-destination-folder-on-cluster>
rsync -avhe "ssh -p 5522" -P <path-to-source-file-on-local-computer> <username>@login.<cluster>.sav.sk:<path-to-destination-folder-on-cluster>
Copying a file from a remote server to a local computer using SSH.
rsync -avhe "ssh -p 5522" <username>@login.<cluster>.sav.sk:<path-to-source-file-on-cluster> <path-to-destination-file-on-local-computer>
Copying a folder from a remote server to a local computer using SSH.
rsync -avhe "ssh -p 5522" --progress <username>@login.<cluster>.sav.sk:<path-to-source-folder-on-cluster> <path-to-destination-folder-on-local-computer>
rsync -avhe "ssh -p 5522" -P <username>@login.<cluster>.sav.sk:<path-to-source-folder-on-cluster> <path-to-destination-folder-on-local-computer>
The following options are commonly used with rsync:
-
-a- Archive mode; preserves file permissions and does not follow symlinks. Archive mode does not preserve hard links, because finding multiply-linked files is expensive. The -H option must be explicitly specified for hard links. -
-v- enable verbose mode, display or get extended information. -
-h- output numbers in a human-readable format. -
-P or --progress- show progress during transfer. -
-e- selects the remote shell (used here for SSH). The "-e" option must be placed before "ssh -p 5522" in the option string; it can be written asrsync -avhe "ssh -p 5522"orrsync -avh -e "ssh -p 5522". -
-z- enable compression, compress file data during the transfer.
sftp Command: Basic Syntax
sftp (secure file transfer protocol) is an encrypted version of FTP designed for a file transfer over network connection. It performs all operations over an encrypted ssh session using its features, such as public key authentication and data compression.
sftpcan be run in an interactive session that logs in to a specified host, where commands can be written at the prompt.
Launch an interactive session on cluster or in specific directory.
sftp -P 5522 <username>@login.<cluster>.sav.sk
sftp -P 5522 <username>@login.<cluster>.sav.sk:<path-to-starting-folder-on-cluster>
sftpcan also be used to transfer files automatically, without any interaction, in a batch mode (running in a scripted fashion).
Copy a file from a remote server to a local computer with sftp.
sftp -P 5522 <username>@login.<cluster>.sav.sk:<path-to-source-file-on-cluster> /<path-to-destination-file-on-local-computer>
sftp -b batchfile -P 5522 <username>@login.<cluster>.sav.sk:/home/<username> /<path-to-destination-folder-on-local-computer>
where batchfile contains:
   cd <path-to-destination-folder-on-cluster>
   put file*.txt
sftp logs out and returns to the command line.
Common options for sftp include:
-
-B buffer_size- Specify the size of the buffer that sftp uses when transferring files. Larger buffers require fewer round trips, but require more memory to do so. The default is 32768 bytes. -
-b batchfile- Enables batch mode. -
-C- Enables compression. -
-i identity_file- Selects the file from which the identity (private key) for public key authentication is read. This option is directly passed to ssh. -
-P port- Specifies the port to connect to on the remote host. -
-q- Quiet mode: disables the progress meter and warning and diagnostic messages from ssh. -
-r- Recursively copy entire directories when uploading and downloading. Note that sftp does not follow symbolic links encountered in the tree traversal. -
-v- Verbose. This option is also passed to ssh.
ssh key path.
If your SSH key is located outside the default folder (~/.ssh), you need to specify the path to the key using the -i flag: sftp -i <path-to-identity-key> ....
Mounting Remote Directory Locally Using SSHFS
You can mount a directory from the HPC SAS infrastructure as a file system on your local computer via SSHFS.
On Linux clients install fuse-sshfs (RedHat distributions) or sshfs (Debian distributions).
Mount home directory from cluster locally.
sshfs -p 5522 -oIdentityFile=<path-to-identity-key> <username>@login.<cluster>.sav.sk:/<path-to-destination-folder-on-cluster> /<path-to-destination-folder-on-local-computer>
After you run this command the directory /<path-to-destination-folder-on-local-computer> should show the contents of <path-to-destination-folder-on-cluster> on the HPC. You don’t need to mount your entire home directory, it’s best to just mount the directory that you require access to.
Unmounting the filesystem.
When you have finished working on your files, unmount the directory; otherwise you could get corrupted files when you shut down your PC. To unmount the filesystem, issue the following command:
fusermount -u /<path-to-destination-folder-on-local-computer>
sudo to run the sshfs command and you might need to add yourself to the "fuse" group.
Download and install the latest stable installer of "WinFSP" from here. Download and install the latest stable 64-bit installer of "SSHFS-Win" from here.
After these are installed you can setup the SSHFS connection as described below.
Open File Explorer, right-click on This PC and choose Map Network Drive. In the Drive field, choose a drive letter that is not already mapped. Already mapped drives will have a location shown after the drive letter. In the Folder field enter:
Mount home directory from cluster with File Explorer.
\\sshfs.k\<username>@login.<cluster>.sav.sk!5522\<path-to-destination-folder-on-cluster>
where <path-to-destination-folder-on-cluster> is the directory that you wish to mount.
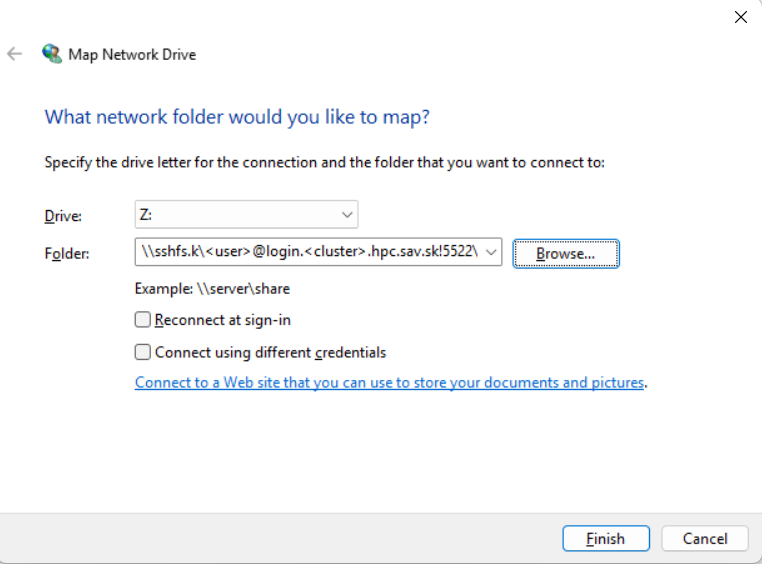
sshfs.k key path
sshfs.k uses the SSH key stored in %USERPROFILE%\.ssh\id_rsa (i.e. C:\Users\<local_user>\.ssh\id_rsa).
Do not select "Reconnect at sign-in". You should only mount your HPC home directory when you need to. It should be "disconnected" when you no longer need to access it. Click Finish.
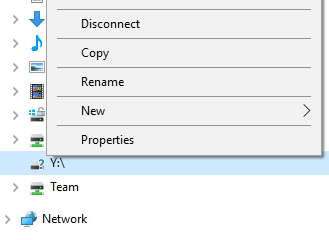
Finally when you have finished your work you should “disconnect” your mapped drive from the HPC. From File Explorer, right click the mounted drive and select “Disconnect”.
Download the latest stable releases of "Fuse for macOS" and the "SSHFS" modules from here. Create a folder on your Mac to use as a mount point.
In Terminal, run the following command to mount the directory on the remote system at the local folder you created:
Mount home directory from cluster with sshfs.
sshfs <username>@login.<cluster>.sav.sk:/<path-to-destination-folder-on-cluster> /<path-to-destination-folder-on-local-computer> -i <path-to-identity-key> -p 5522
Unmounting the filesystem.
When you have finished working on your files, unmount the directory; otherwise you could get corrupted files when you shut down your PC.
Windows Clients
These options work on Windows after installing the respective client (MobaXterm or WinSCP); they provide a GUI alternative to the scp/sftp commands explained above.
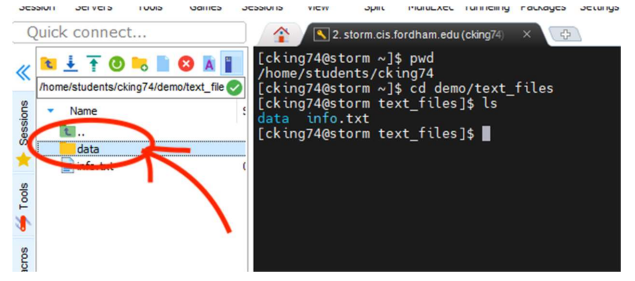
- Using MobaXterm, you can easily view and access the remote machine using the window to the left of the terminal. You can see its current location displayed in the top bar and navigate through the machine by clicking on the folders as shown in the screenshot below.
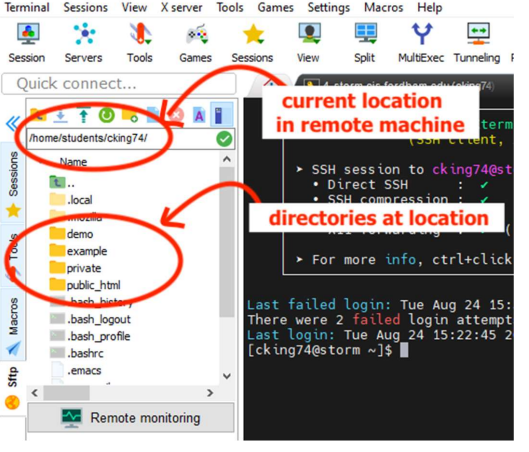
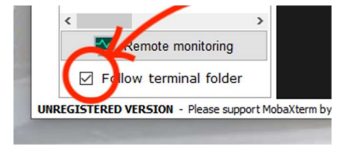
You can also navigate the machine via the command-line in the window to the right and see the changes reflected in the folder to the left if you check the Follow terminal folder box.
- To download a file onto your local machine, first locate and select the file on the remote machine that you wish to download using one of the methods explained above. (Downloading a file or a folder is the same process.)
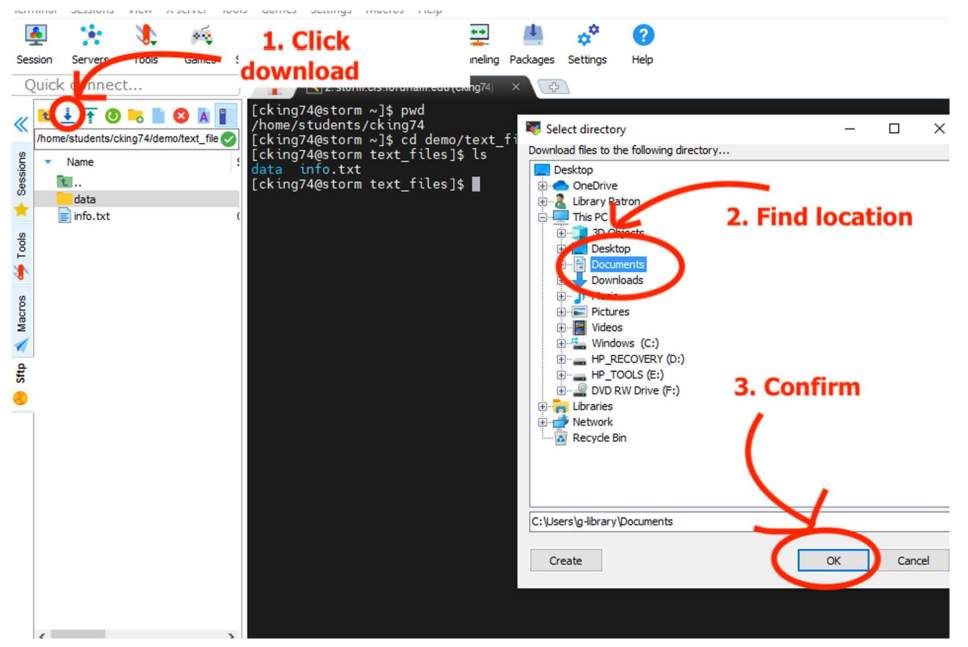
- Next, click on the blue download arrow. A window displaying your local machine will pop up prompting you to select the location where you wish to download the files. After doing so, click the OK button to confirm the download.
The newest version of WinSCP client can be downloaded and installed from here.
- Connect to HPC cluster with the authentication key.
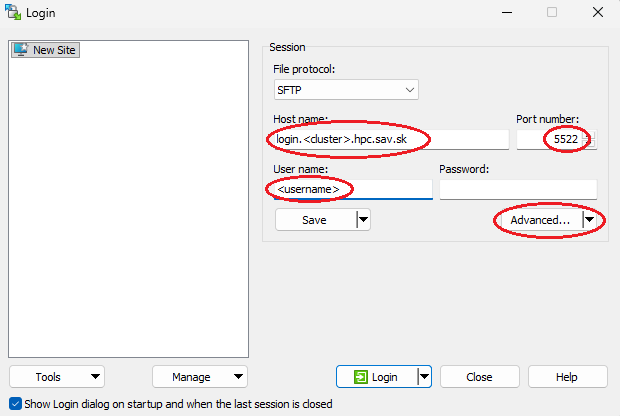
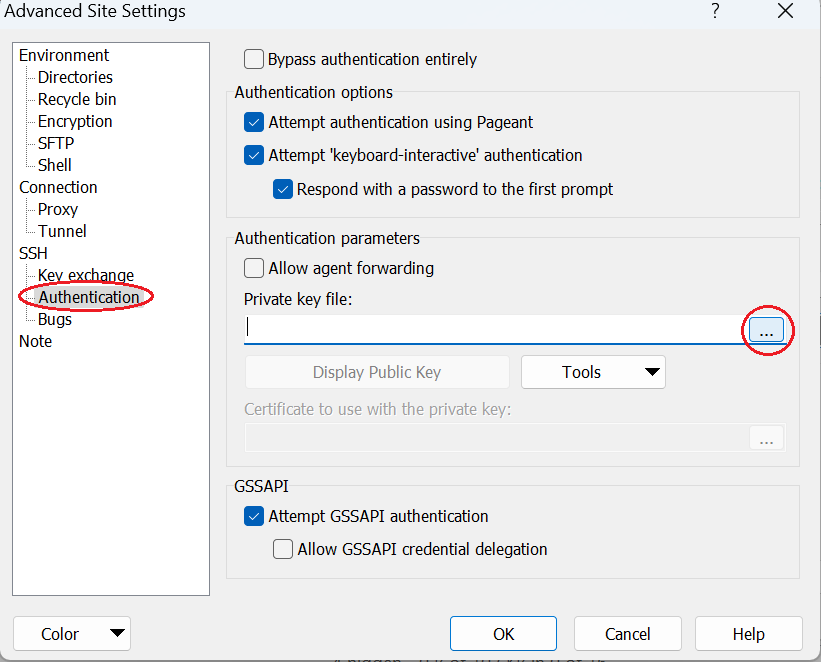
- The WinSCP file transfer window is displayed after connecting. The left pane shows the local computer, the right pane the files of the remote computer. Drag the file you want to transfer and drop it on the other side.
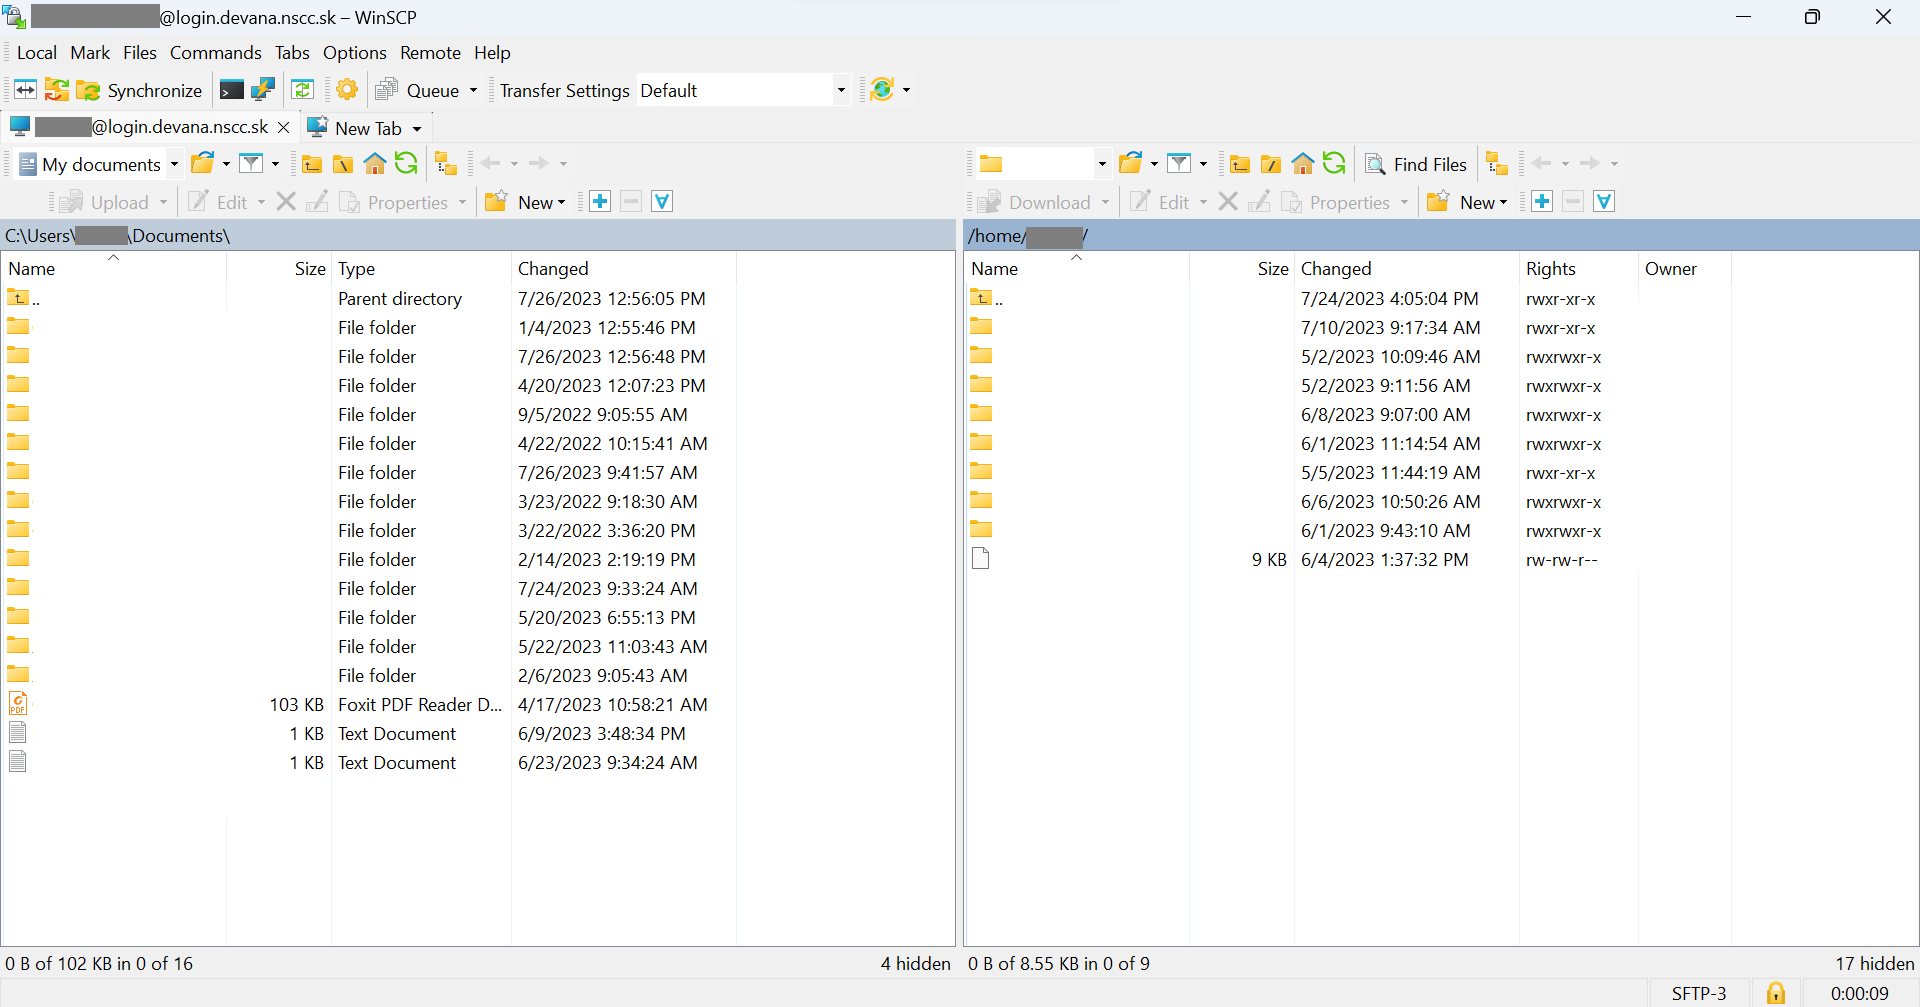
- Choose the file location in the pop-up window, and then click OK to start the file transfer.
Open OnDemand
To transfer files using Open OnDemand, see the file transfer section.
Transfer Data from Internet to Cluster
One of the most straightforward ways to download files is to use wget. Any file that your web browser can open from a direct link can also be downloaded with wget. This is a quick way to download datasets or source code.
For example, download a file from the internet using the following command:
wget <URL>
Sometimes the data, pipeline or software you need is stored in a repository on GitHub or GitLab. In this case you either download individual (“raw”) files using wget or the whole repository with git clone.
For example, download this test repository with:
git clone https://github.com/octocat/Hello-World.git
It will be saved into the current directory with the new folder having the name of the repository, so "Hello-World" in this case.